After conducting the usability testing of the game, I think it is fair to say me and my teammates have been able to produce a good game prototype. Even though, we haven’t been able to achieve our goal, we were still able to produce a game that is playable. In the beginning of our journey we had many issues regarding what each of us wants from this game. We managed to agree on the most important aspects and started working on them. One of the many good decisions we made as a group, was to focus on delivering a working prototype, instead on spending time on complicated features which could not be implemented at all. After facing unforeseen circumstances, we still managed to keep working on the game as a group and remained in constant contact.
Another important decision we made, was to assign each of the team members with their roles from an early stage. Each of the tasks were tailored to the person’s best qualities and we were able to take great advantage of everyone’s talents. By doing this, we made sure that each of us had a task to focus on and it was easy to see if the development was progressing according to the plan. This is in contrast to what I did with my group for the last game, where we didn’t assign specific tasks to the members of the group, which lead to a complete chaos in the beginning.
There were many minor issues, including technical and communicational. Some of us had technical restrictions, which lead to task reassignment. There was also, once again, many issues with GitHub. But we did manage to solve them calmer and more efficient, compared to the last time. However, the biggest problem was the lack of time. Because of the circumstances, many of us didn’t manage to complete their assigned tasks in time. This lead to restructuring the game as a whole. Many key elements from our initial plan are missing in our prototype because of this. I wanted to include much more actions and behaviours to the npc, but simple wasn’t able to, because of the restrictions we encountered. Throughout all this, we managed to stay together as a team and discussed each important decision. If someone wasn’t able to complete their task, someone else took it or we restructured our tasks according to the change. Also, if someone was more familiar with certain matter, he gave his advice and shared his experience with the team.
Even though we didn’t manage to create the game we wanted, we were able to deliver a very good prototype with much effort and work. I am very satisfied with the fact that this game is a great improvement from the previous game, I was involved it. Also, I was able to gather much experience. I learnt not only more core game development skills and how to work with different software, but also how to work under pressure and manage my time and tasks.
Even though the game is nowhere near finished, there are plenty of content, features and mechanics that have been added. I think it is fair to say that we have a working prototype of our game and it is time to test it. This is a vital part of the development, as we would understand if the developed features are useful and working properly, and also to learn if we are headed in the right direction. To do that, I have to play the prototype, as if I have never seen it, and evaluate its playability. In order to stay as unbiased as possible, I am going to be using the Heuristic Evaluation of Playability for guidelines while playing the game. As we are still in the early stages of development, I think this is the best time to use these heuristics and the best way to assess our work. This method is also great because it has been used before and is established as good method for evaluating playability.
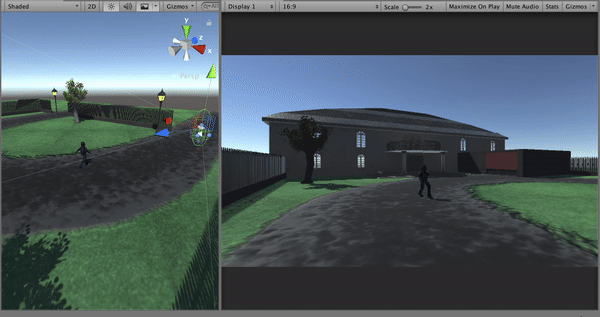
The team made a short video showing gameplay form the first level.
The four main aspects, which I am going to evaluate are the game play, game story, mechanics and the usability of the game. I am also going to try to evaluate the whole experience and enjoyment of playing.
After playing the game, I have noticed that there isn’t a big variety of activities. The game is short and there aren’t many levels, but that doesn’t mean the number of activities should be low as well. While there are many ways to avoid the robots and cameras and the player could choose between different paths, that’s about the only activity there is. Another thing I have noticed while playing “for the first time” is that there are not clearly set tasks. I know what is the main task and what to do next, but that’s because I was involved in the development. A person who plays for the first time wouldn’t have any idea what to do. There aren’t any signs or guides of what the player has to do. Both of this issues could be easily fixed. We could add more and different activities and also set instructions for the player, whether that would be implemented in the story or literally just written on the screen. This is also related to the lack of any tutorials. There is no introduction to the game mechanics and controls. However, the solutions to these issues require one major resource which we are lacking. Most of the issues I have found in the game could be easily fixed, but they all require much more time than we have. Other game play issues I have spotted are: the game is not really enjoyable to replay. Once you have completed the main task to rob the mansion, there really isn’t anything else to do. Since you already know how to do it and there aren’t many options to completed it in other ways, the game feels boring to replay. This could also be fixed with adding more activities or ways to complete tasks. Overall, the gameplay lacks many features and doesn’t meet most of the requirements of the HEP. While many core gameplay elements are developed, there hasn’t been put much thought about the actual player of the game.
The story is hard to evaluate because our game literally lacks any story. We though about the main objective, which is important, but a key element is missing. We have to come up with a story and implement it in the game. Without this, the user is not attached to any characters and is not interested and involved in the game. The scenes are not put in any context. After we spend a lot of time creating a story, it is also vital to create a way to integrate it in the actual gameplay, so the user can understand it. The. solution to this is that we spend a lot of time working on the story. However, we are a small team any time, spent on the story, is a time that we are not investing in developing other aspects of the game. This means that we have to come up with a short and simple solution to the problem.
The game mechanics could be considered on the well developed aspects of our game, according to the heuristics. The game does make use of the AI and it is clearly visible by the player. The AI is also consistent with the reasonable player expectations of the AI actor. The guard moves and acts as a real life one would. He patrols and stops occasionally while looking for threats. Also, there are simple and reasonably mapped controller actions. They are intuitive and easy to get used to. This is because we used the standard for most games controls – “wasd” to move, “spacebar” to jump, etc. However, there is no actual way of figuring out the controls, except from trying them out. This problem and the fact that the player is not able to always keep track of their progress, refer back to the lack of any tutorial, hints or clues for the player. As for meeting the users expectations and following the game industry trends, the game does feel similar to other games in some aspects. This is a good thing, because the player feels comfortable while playing. As already stated, the controls are standard, the scenes are familiar and the main goal of the game has been used used in many other games. Many of the mechanics issues could be fixed with better implementation of existing features. we should spend more time on development and testing the features, we already have.
From usability standpoint, our game is once again missing some important features. There isn’t any immediate feedback from the user’s actions. Sometimes there isn’t any feedback at all. For example, when the player gets spotted by the robot, the level immediately restarts. There isn’t any visual or audio feedback. This may leave the player really frustrated. We are also missing some key features like menu, settings and manual. The lack of manual or tutorial also contribute to the fact that the game couldn’t be played easily without them. Even though we tried to make it intuitive as possible, I still feel that a normal user would be confused and frustrated with learning to play the game. As for the art of the game, it is easily recognisable by the player and easy to tell what their functions are.
Overall, the game lacks many key elements and couldn’t be considered as very good developed, from playability standpoint. Even though, we haven’t implemented many vital features like game menu, story, immediate action feedback, I am satisfied with the direction the game is headed. There is a good main idea and the implementation of most of the existing features is good. The absence of many core aspects could be explained with shortage of time. Even with many elements missing, I was still able to enjoy the game. In order to fix the issues and continue further in the development, we need to look at what we are missing, fix the problems, and manage our time correctly.
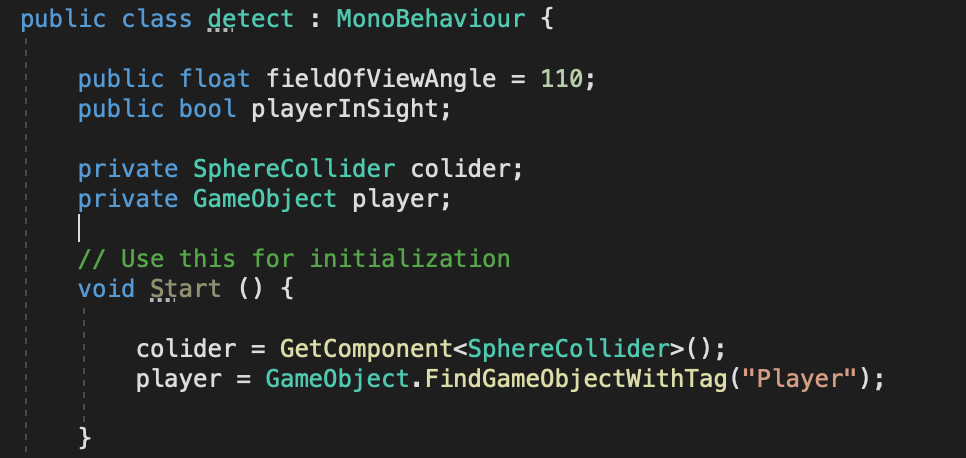
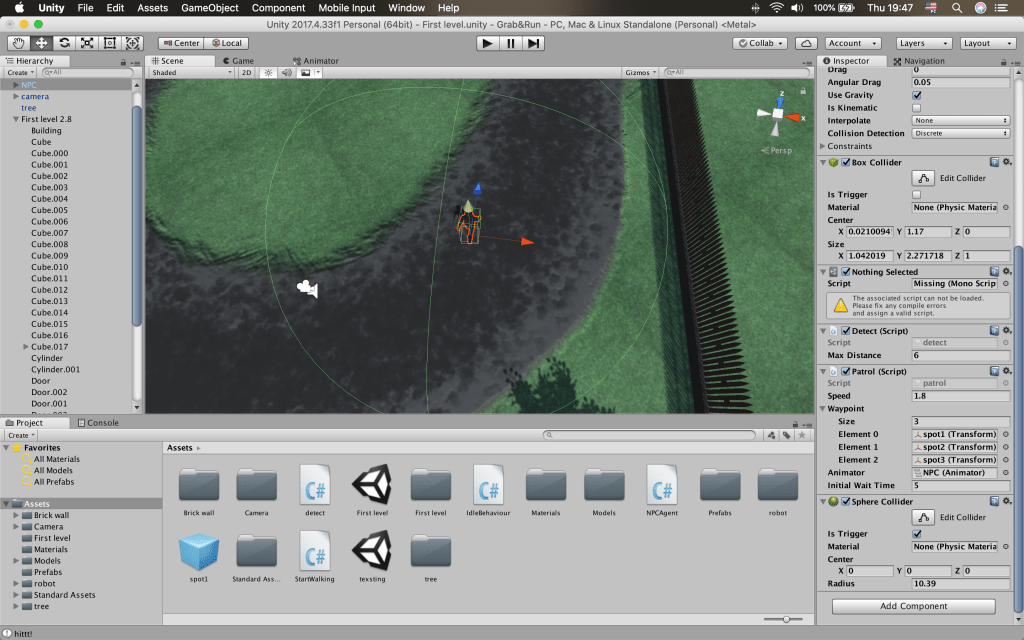
After I was done with making the npc patrol, i had to add the other state of the robot. This had to be either the chase or the shooting state. For those states to be activated, the NPC has to notice the player. In order to trigger an action when the player has been detected, I first have to make a script to detect the player. I started by creating a variable for the angle of view of the character. This variable is public, so I can tweak it in the editor while testing. Then I created a public bool to check if the player has been detected. I could also access this bool from other scripts later on, in order to trigger actions related to the player being noticed. In order to make this bool true, three criteria have to be met. The player has to be in the radius of the npc, he has to be in the field of view of the npc, and no obstacles have to be between the npc and the player. I am going to determine the radius, in which the player can be detected by adding a sphere collider to the npc. I can tweak the radius of the sphere while testing. After creating the field of view variable, I created a reference to the collider and to the player.
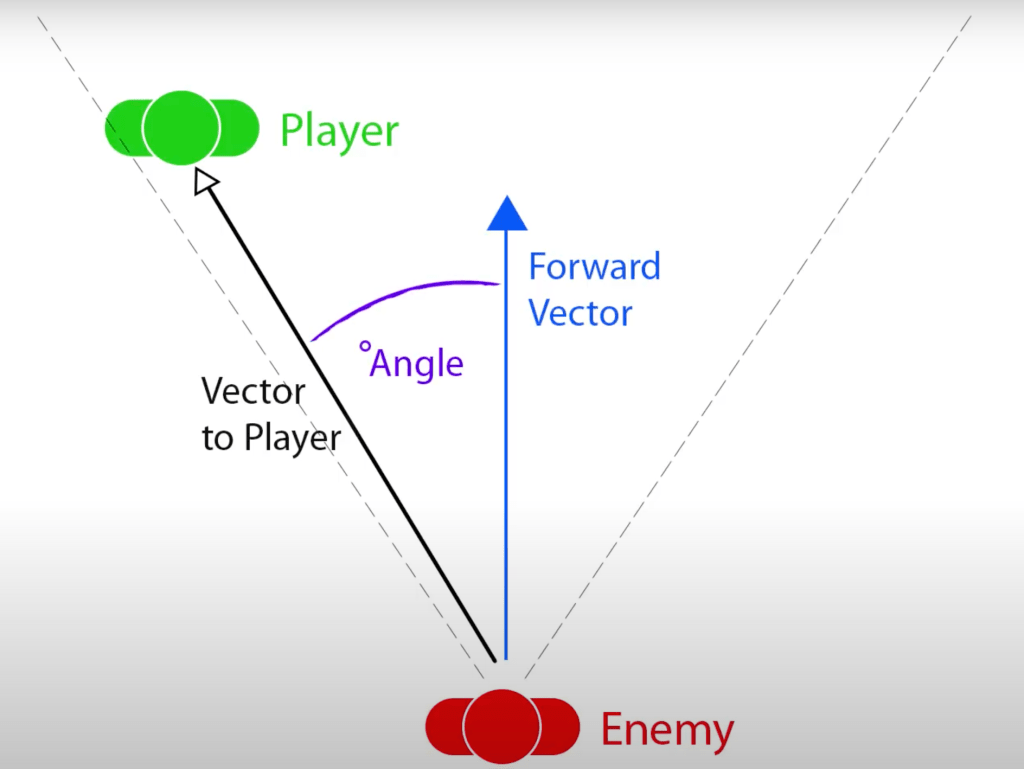
After that, I moved on to the first condition that has to be met. In order to check if the player has entered the sphere around the robot, I used the onTriggerStay function to check if an object has entered the sphere. Then, I created an if statement to check if this object is the player. If this statement is true, this means the player is in the detectable radius of the robot. This however, still doesn’t mean the player has been detected. This is why I set the playerInSight bool to false. After this is checked, I need to check if the player is in the field of view of the robot. To do that, I created a vector3 variable, called direction, to store the direction of the player relative to the robot. I then created another float variable to store the angle between the direction of the player and the forward position of the robot. If this angle is less than half of the determined field of view angle of the npc, then the player is in this field of view.
This means that the second condition is met, but the player may still not be visible by the robot. An object may be in the way. To check if this is the case, I used Raycast. I created a new RaycastHit to store the information from the hit and created an if statement to check if it actually has hit something. The Raycast origin is going to be the npc’s position, the direction is going to be the direction of the player, and the length is going to be the radius of the sphere collider. Then I check if the hit is actually the player. If it is, all the criteria for spotting the player have been met and I set the playerInSight bool to true. I also added a message for the debug console to do some testing.
After many tests, I have found that the Raycast origins is actually in the robot’s feat and all of the hits are in the ground. I changed the origin from transform.position to transform.position + transform.up. This way the Raycast origin is going to be higher up the body of the robot. Another thing I forgot to add was a collider to the player, which is actually the main camera with a fps controller attached to it. After those adjustments, the script was working as it should and the player was getting detected by the robot if the right conditions are met.
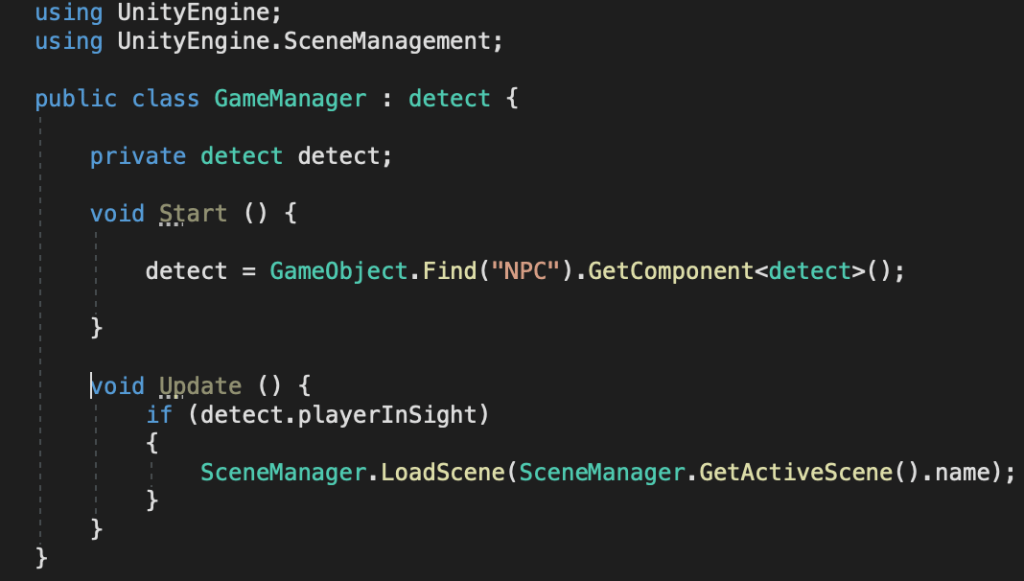
I was done with adding the ability to detect the player to the robot. But the question of what the robot has to do after that remained. My initial idea was to trigger a chase or a shooting animation. Since we don’t have shooting mechanics yet and there are no fight animations, I am simply going to write a script to restart the level after the player has been spotted. Later I could implement the playerInSight bool as a trigger in other behaviour if necessary.
To restart the level, I created a new script, in which I used the UnityEngine.SceneManagement namespace. Then, I created a new instance of the detect class and used the npc game object to get the script component. In the update function, I checked if the playerInSight bool is true and if it is, I used the scene manager to load the current scene.
Now that I have the textured NPC model, along with animations for it, the only thing I have left is to make it come to live. I did a lot of research on the NPC development. There are many ways to make this character intractable and useful. Most of the articles I read pointed out that a non-playable character has to be responsive to the players actions, while also being able to act independently from them. This robot plays a key role in the game. He has to be the power that stops the player from achieving his task. I have to adjust the robot’s behaviour, so that he provides a challenge, while not making it too difficult for the player. I would try to not the make player frustrated and not make him bored either.
I have to make a script that switches between three different states of the character. First, I have to make the robot move between multiple preset locations. I am also going make him stop for a short time at those locations and trigger the idle animation. Also, while he moves or stays idle, he is going to be looking for the player. If he spots him, he is either going to switch to shooting, or chasing the player. This is something we haven’t been able to make a decision on yet.
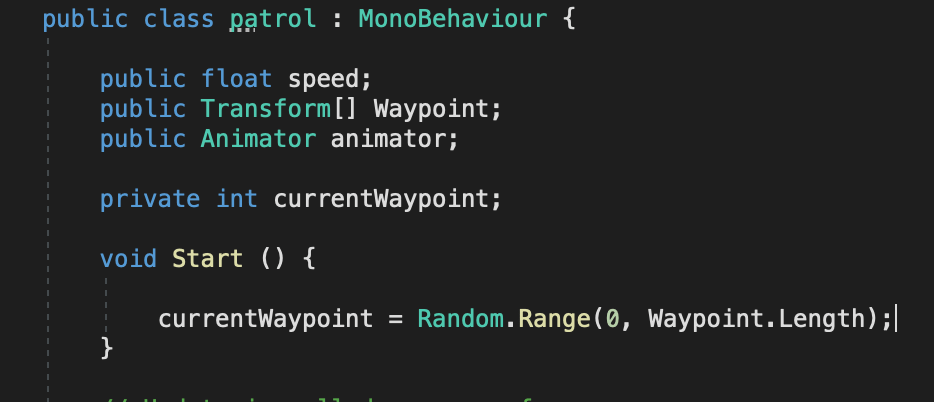
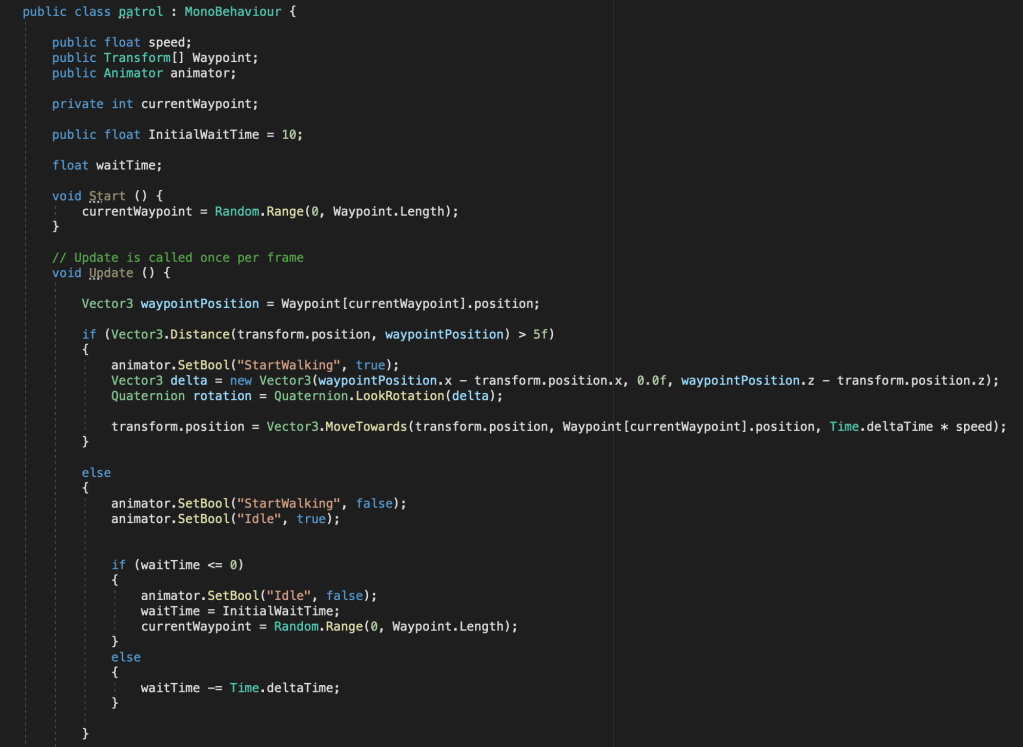
I started to make the patrolling script. I have noticed that a common approach is to use NavMesh for the purpose of most NPC movement. While this is really intuitive and easy to implement future, I think it could be considered as a complicated solution for a simple problem. The NavMesh system is powerful for variable terrains and finding paths trough obstacles. Most of the terrain of our game is a single plain and there aren’t many obstacles where the robot is going to be patrolling. One of the things I have learnt from the last game is to not overengineer simple solutions. That’s why, after watching countless YouTube videos on the topic, I have came up with a relatively easy script.
I started by placing the robot in the scene and creating three empty game objects which are going to be the waypoints. I then created a new script and attached it to the character. I created a public variable for the speed of the character’s movement, so I could tweak it in the inspector. Then, I added an array of transforms, which is again public. This way I cloud add new waypoints and remove them without having to edit the script. I also made a reference to the NPC’s animator, as I’ll have to switch between different animations.
I also added an integer to keep the number of the current waypoint from the array. I used the random class to select a random waypoint from the array. I chose to do a random number each time, as opposed to going through them one by one, because this way the NPC’s actions are going to be more unpredictable and it is going to be harder to avoid. In the update function I created a new vector3 variable, which is going to hold the position of the current waypoint. After that I check if the robot’s position is further than 5 units from the waypoints position. If the statement is true, the walking animation had to start. I set a new bool in the animator to do just that. While I was there I also did the other transitions and added another bool for the idle animation.
After starting the walking animation, I had to make the character face the destination. To do that I used a new vector3 variable to determine which direction to rotate the character towards and by how much. Then I used Quaternion to actually rotate the character. In order to move it, I used the MoveTowards function with the position of the waypoint as a target and multiplied the speed, which I declared earlier, with time.deltaTime, so the movement is frame rate independent.
If the character position was close to that of the waypoint, I wanted it to wait there for a bit and trigger the idle animation. I went back before the start of the functions and declared two more variables. One to hold the time to wait and one to hold how much time is left. Then I went back to the else statement and set the walking animation bool to false and the one of the idle animation to true. I made more statements to check if the waiting time has passed or not, and if it has, I selected another random waypoint as the current one. If not, it subtracted time.deltaTime from the time remaining.
One thing I have noticed while testing this code is that sometimes the character starts for a long time in one waypoint. This is because there are only three of them and the chance of selecting the same one again I big. I could have fixed that by adding another array and removing the selected waypoints from the original one, but I prefer it like this, as it adds more uncertainty to the character’s movement.
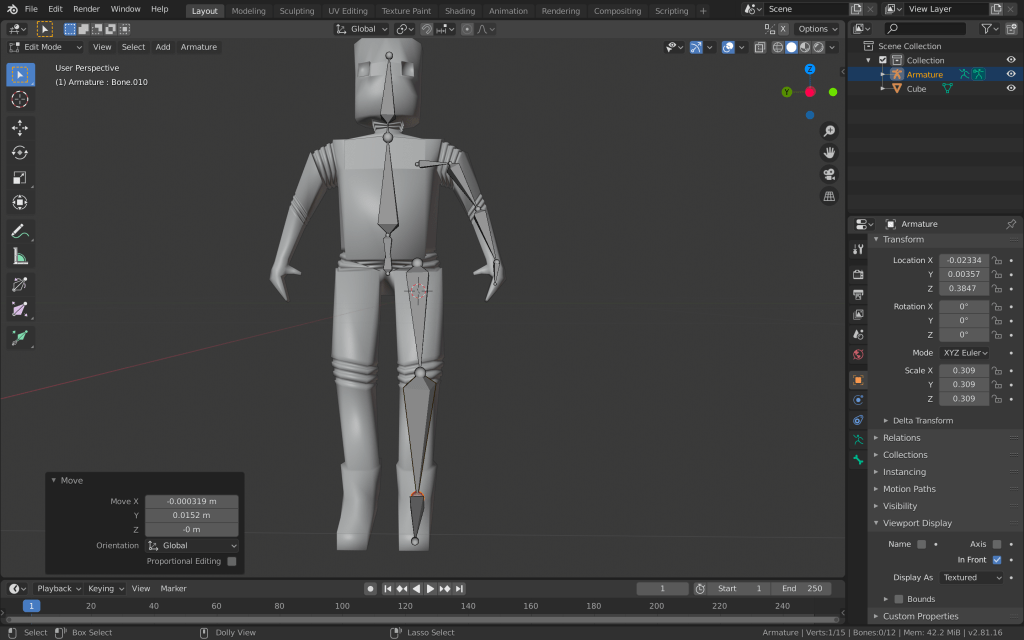
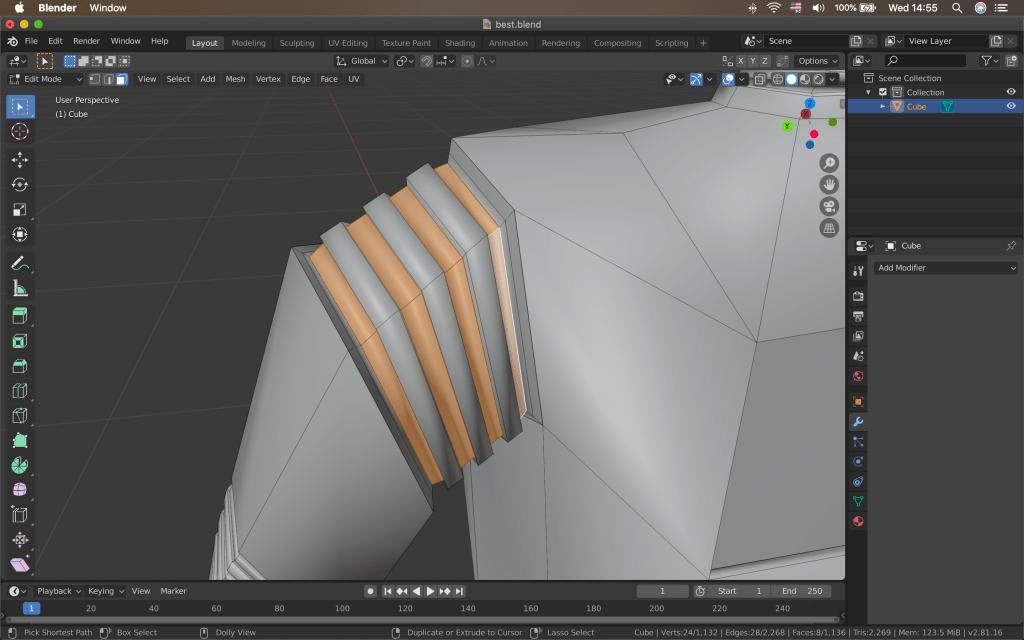
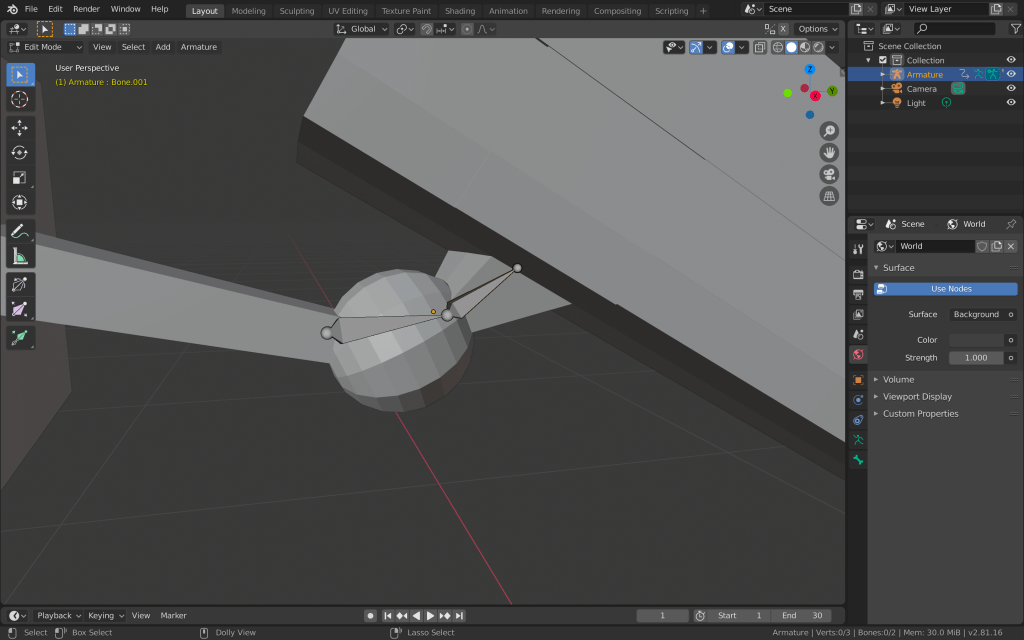
I was done with modelling and texturing the robot, so it was time to add an armature and to create some animations. I started with adding an armature object to my blender scene. This added a single bone, which I had to scale and place inside the robot mesh. I placed this bone in the centre of the torso and extruded four more bones from it- for the hip area, chest, neck and the head.
I kept the first bone rotated downwards, so I could use it later as a controller bone. I also added bones to the arm and leg. I did only one side, so I can once spare time and later make use of blender’s ability to symmetrise.
After placing all of the bones I need for now, I started adding some controller bones, which are going to make it easier for me later when I am posing the armature for animating. I placed them at the end of the hand, leg and opposite the elbow and knee. Some of them were hard for me to select, so I switched to B-Bones and scaled up the controller bones.
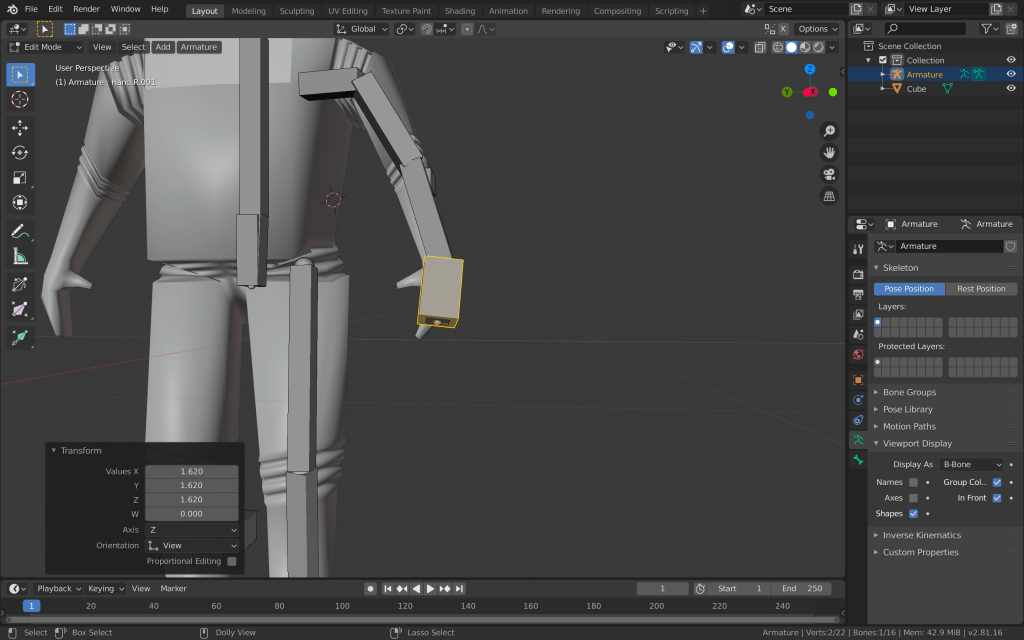
After that, I started adding the bone constraints. I used inverse kinematics, as it is the most intuitive and easy to use for an armature like this.
I aslo applied the copy rotation constraint to the hand and foot bones, so I could control their rotation and the rotation of the linked bones, with the controller bones. After making sure each bone is named correctly, as it is vital for the symmetrising, turned on X-Axis mirror and enforced symmetry. Then, I selected the mesh and made it a parent of the armature with automatic weights. After playing around with the pose mode however, I found out that some bones affect too much some parts of the robot. That’s why I went to weight paint mode and adjusted the weight of some of the vertex groups.
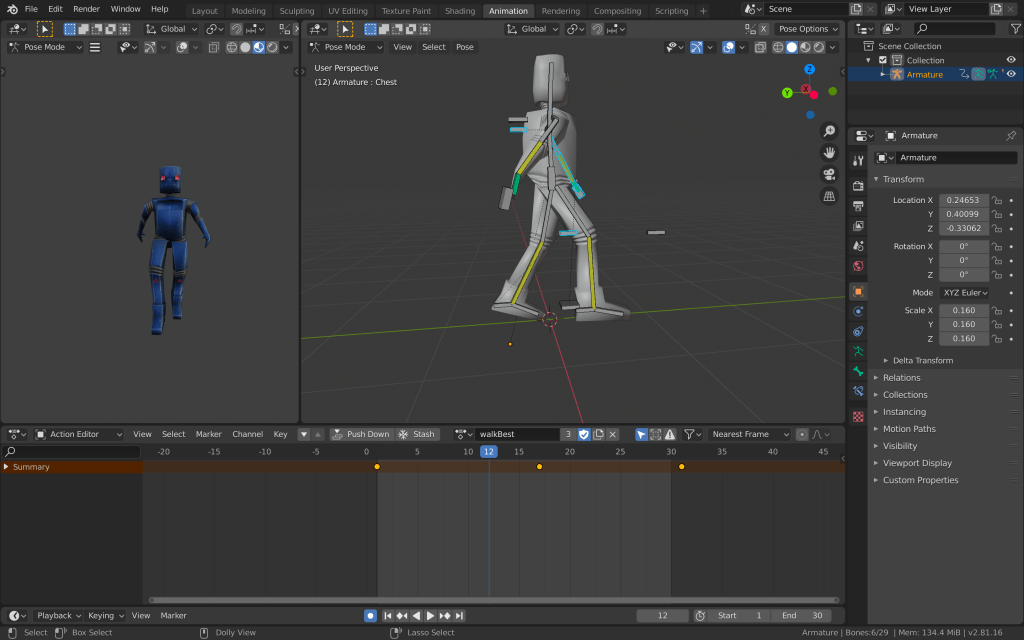
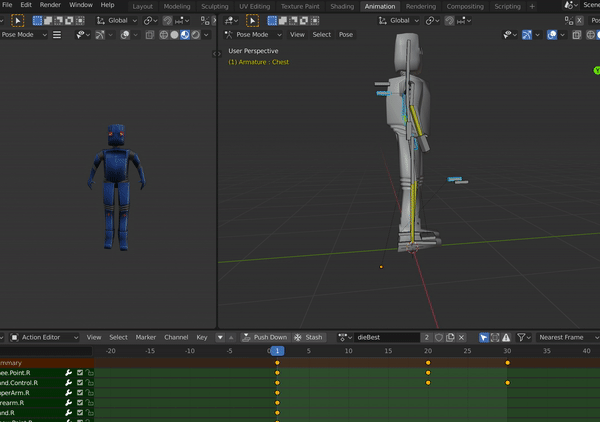
I created a new action for the walking animation of the robot. I set the sequence to 30 frames and went to pose mode. I placed one leg in front of the other, adjusted the body and hands accordingly and added a keyframe to the first frame of the sequence. Then I copied this position, went to just after the end of the sequence and pasted it, adding another keyframe there. Then I moved to the middle of the sequence and added another one, with the opposite position. This way, I was able to achieve a simple but effective loop of a walking animation.
I also added simple idle and a dying animation using similar methods.
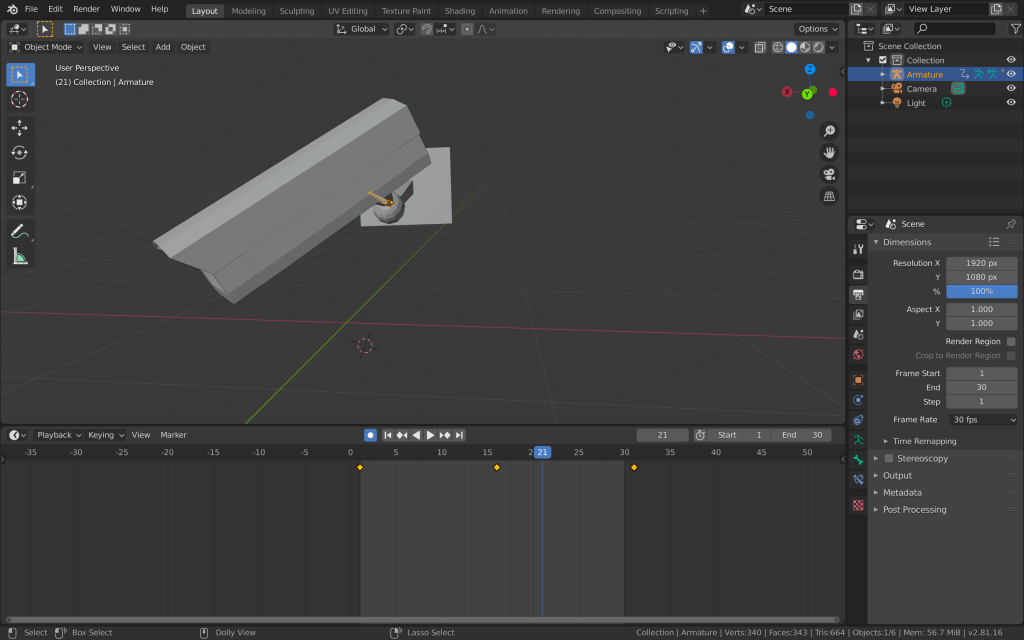
After I was done, I once again exported the file to unity to make sure all the animations import correctly.
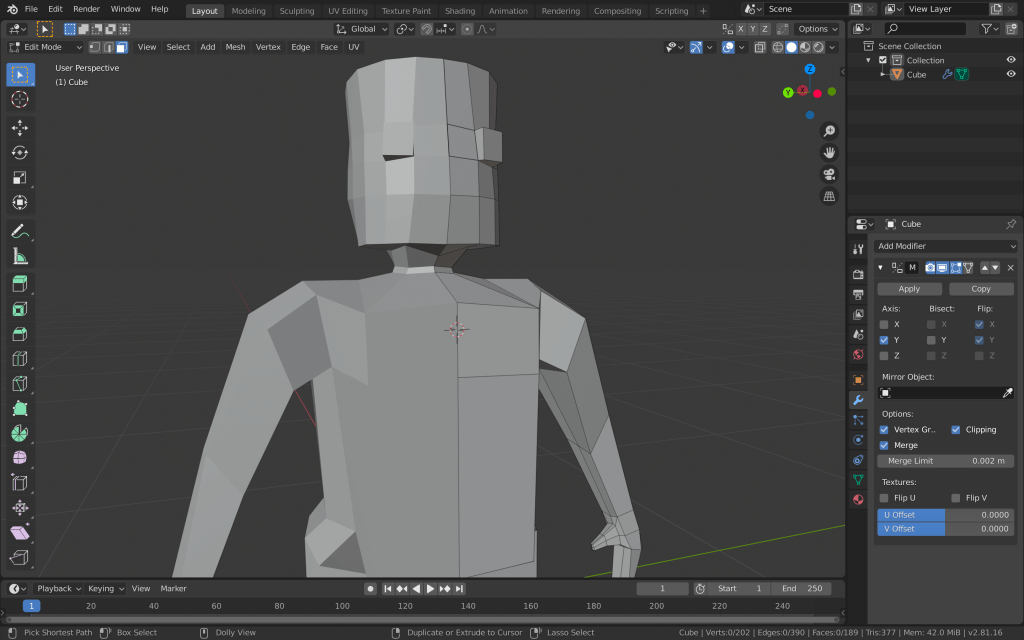
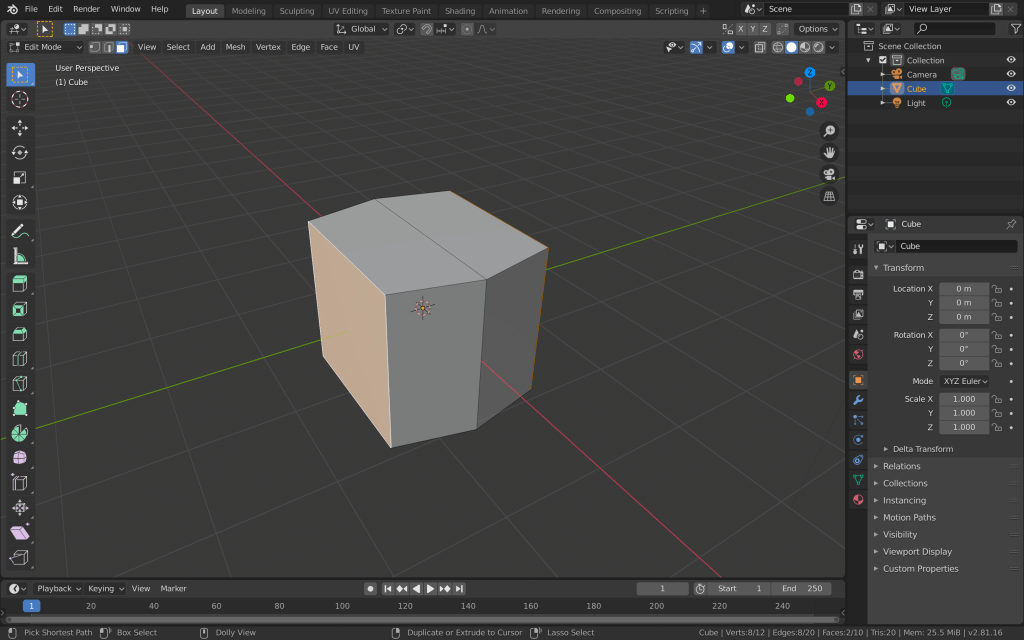
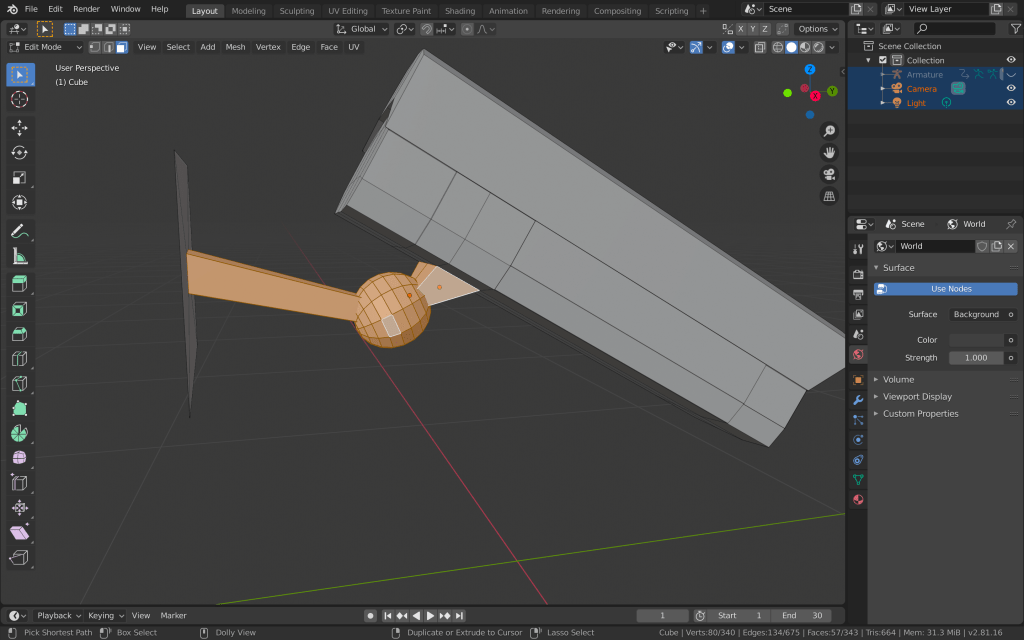
After I was done with most of the props that I have to do according to the plan, I moved on to creating one of the most important parts of our game. The npc would play a vital role in this game, as it is one of the major elements that are stopping the player from achieving his task. After a lot of research on non playable characters, I have learnt many things that I should include in my npc. I have to create a robot which is going to guard the premises of the mansion. His role is going to be patrolling outside and inside the mansion and engaging in combat with the player on different occasions. The first step is to create the model of the robot. I once again used blender for the 3D modelling. One thing to keep in mind while doing this, is that this model is going to be very low-poly. I won’t go in much details of the character and I am going to stick to sharp edges where possible, in order to recreate the image of robot cliche, as it is seen in most movies and some old school games.
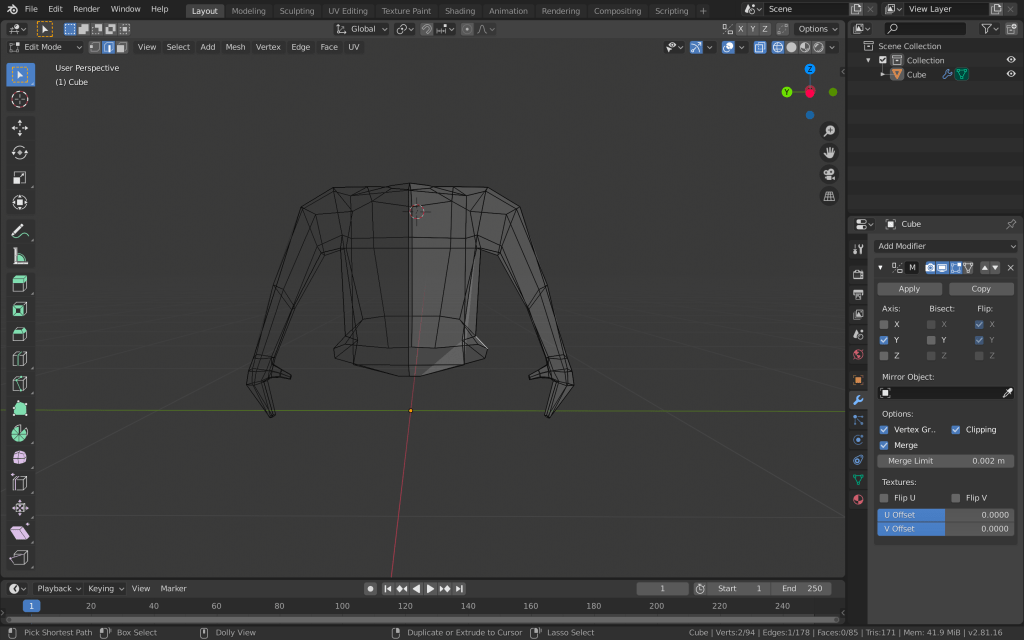
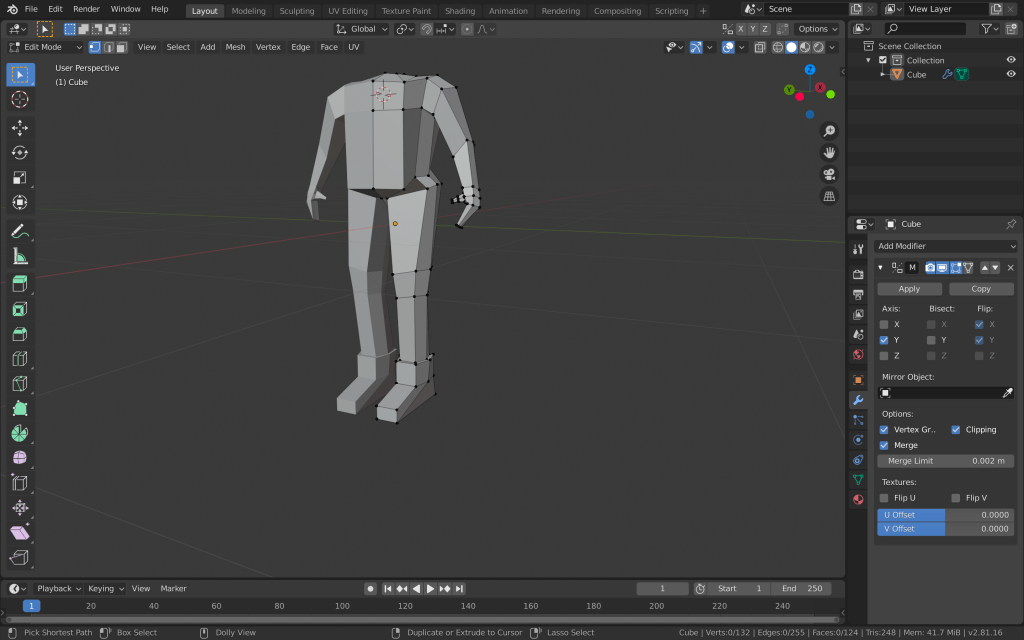
I started by cutting the cube mesh in half and applying the mirror modifier to it. This way I am going to save a lot of time and avoid asymmetry, by having to create only one part of the character’s body. I used the cube for the torso of the robot. I then extruded the cube and added loop cuts, so I have more vertices and edges to work with. I formed the torso and then started adding the legs and arms by extruding the faces from the torso.
I created simple arms and hands with just a thumb and no individual fingers, since he is going to ahold a gun. I created the legs with extruding the two bottom faces, adding loop cuts and scaling them for the knees, and extruding and joining edges for the feet.
I added another cube mesh with a subdivision surface modifier for the head. I cut it in half and added the mirror modifier to it as well. I formed the head how I wanted it to be and deleted the bottom faces. I then deleted the top faces of the torso, made a circle with the vertices and extruded the edges to make the neck. After that I joined the two objects and then joined the edges of the head with the edges of the neck.
I also wanted to add rubber tubing-like forms to the “joints” of the robot. I added multiple loop cuts to these parts, selected every second face that was created, extruded them and then scaled them down.
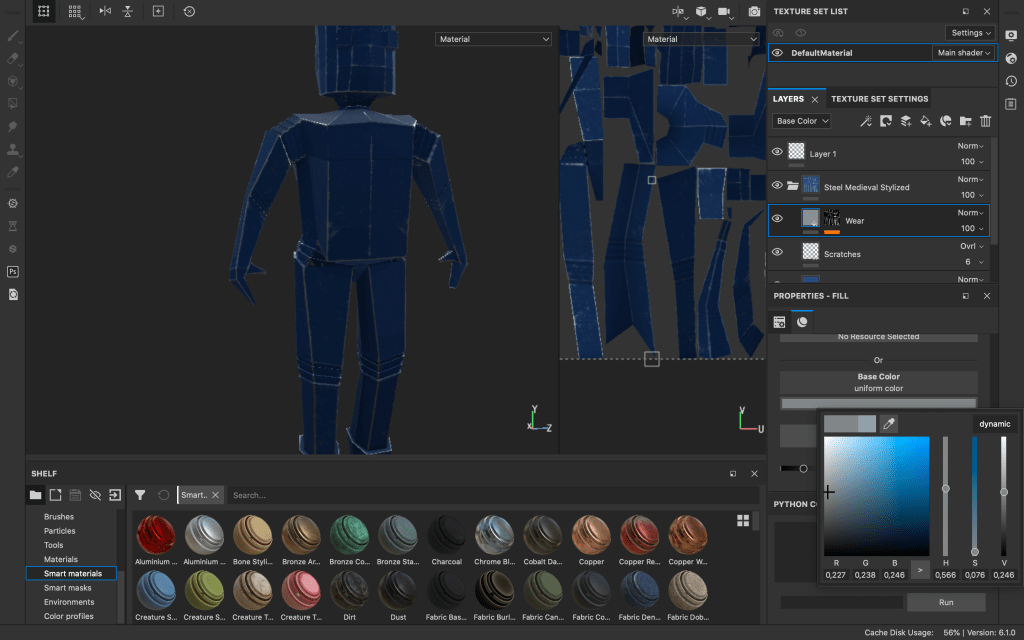
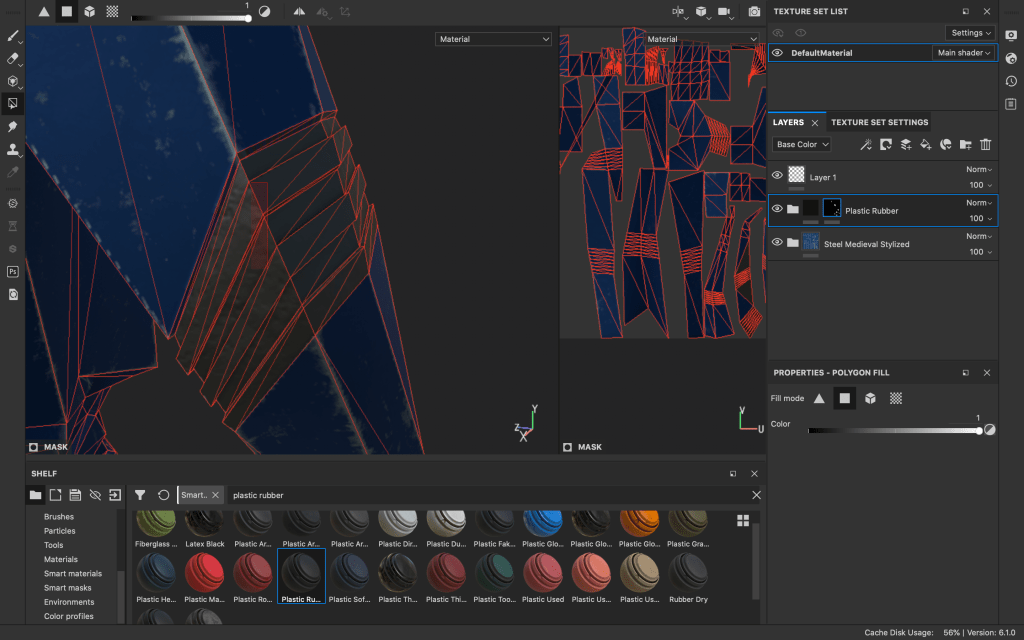
After adding a bit more details, I was done with creating the model of the robot. I then moved on to texturing the npc. I have decided to use substance painter for this purpose, since this is a very important game object and I could take advantage of the advanced texturing options substance painter offers. I unwrapped all of the model’s faces with smart UV project and imported everything to substance painter.
From there I selected a steel smart material and added it to the layers. I changed the base colour and the wear and scratches intensity, colour and roughness.
I also wanted the “joints” I made to have a different material, so I added another layer with a plastic rubber material. However, this covered the whole mesh, so I added a black mask to the new layer. Then, I selected polygon fill and filled only the parts, which I wanted the new material to cover.
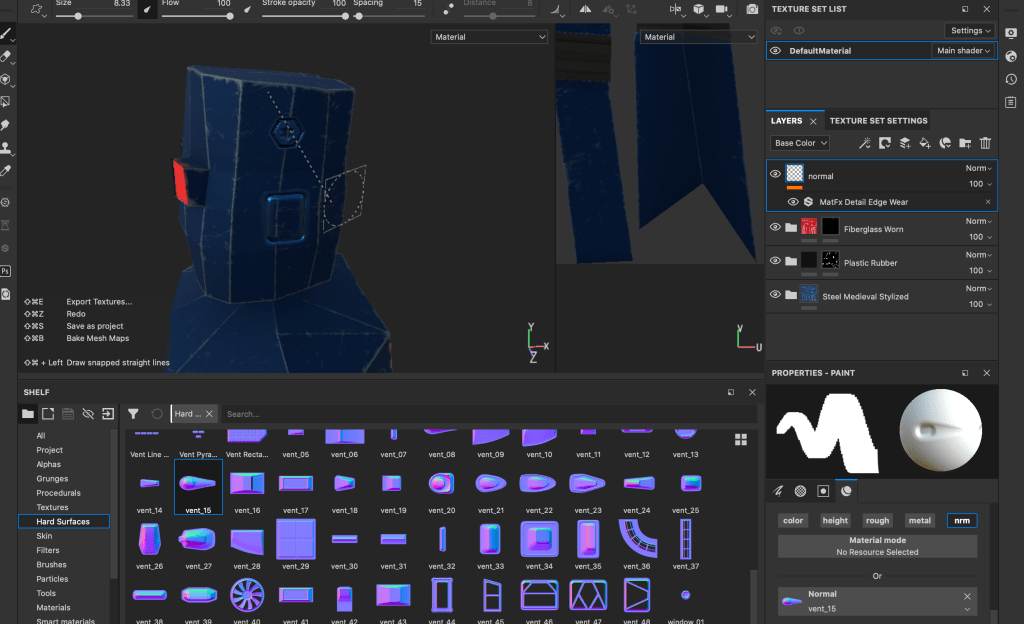
I did the same for the material, which I used for the eyes of the robot. After that, moved to adding a bit more details, like text and decals. For this purpose I added a new layer after the scratches and wear layers of the base steel material. This way the new graphics I add would fit with the texture of the robot and would also have the same imperfections.
After adding the alpha stamps, I added another layer, which I am going to use for adding more detail and hard surface elements to the normal map of the robot.
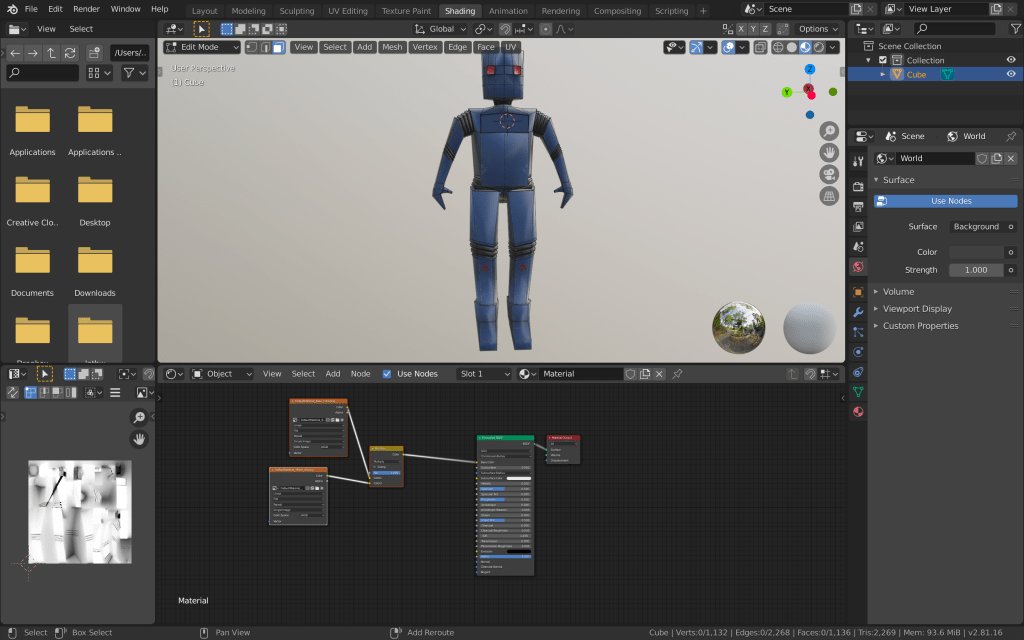
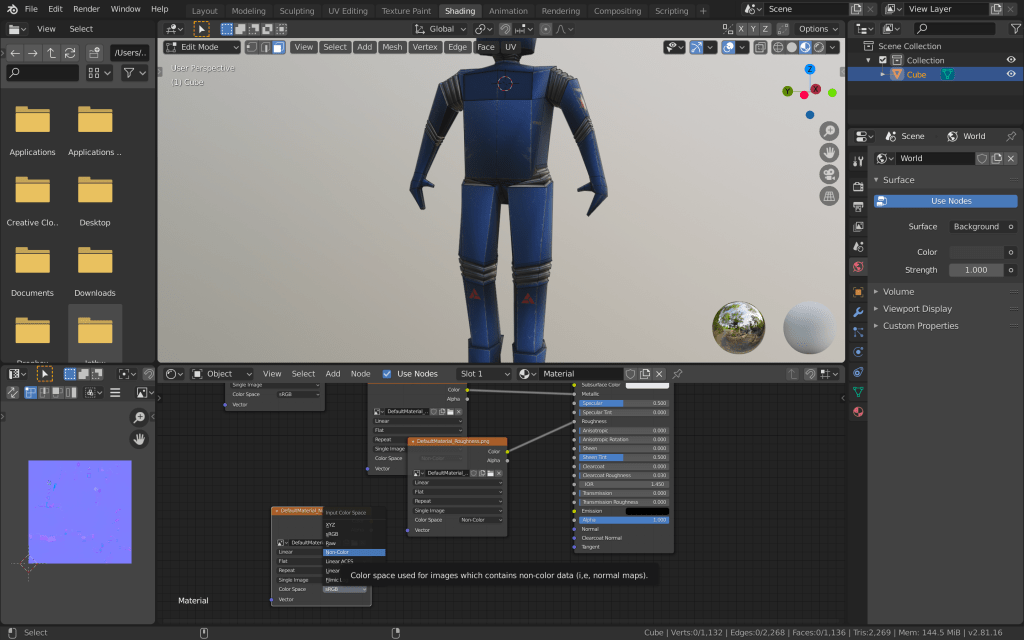
After I was happy enough with how the robot looks, I exported the textures from substance painter. After that I went in blender again and started adding the textures using nodes, different mixers and multipliers and applying the correct settings to the different maps.
I checked again if the textures are as they should be and exported the mesh and the textures to unity to check if everything is correct.
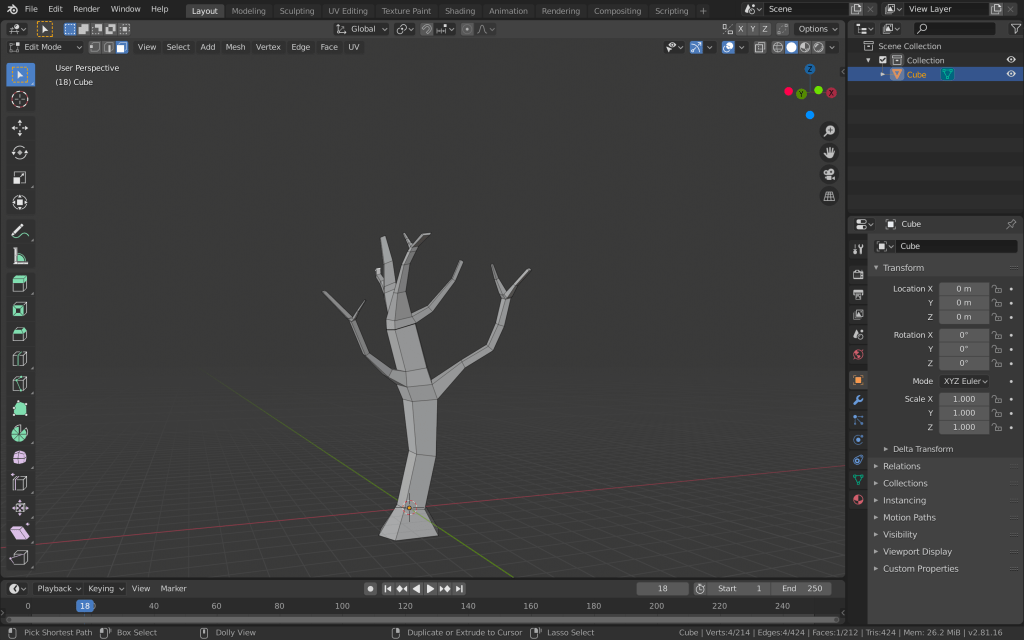
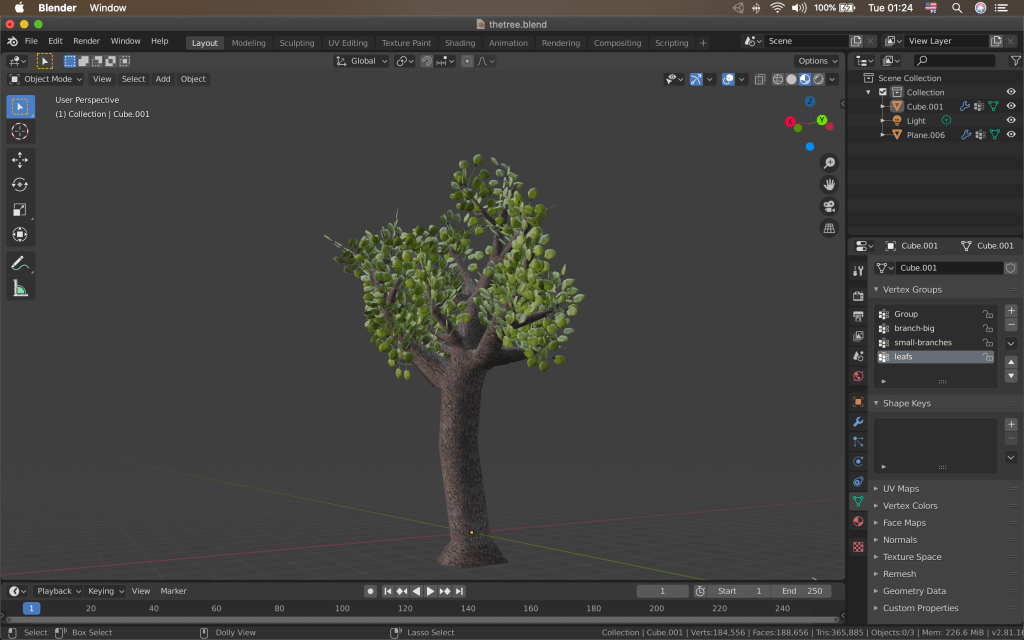
Another environment prop I wanted to do was the trees for the first level. I started like most of the props with a cube mesh. I made a loop cut trough the middle and scaled the faces.
this was the bottom of my tree from which I started extruding the base and the branches. I extruded until the middle from where I started extruding the individual branches, from which I made smaller branches… I was also making loop cuts in existing branches and kept extruding, scaling and moving.
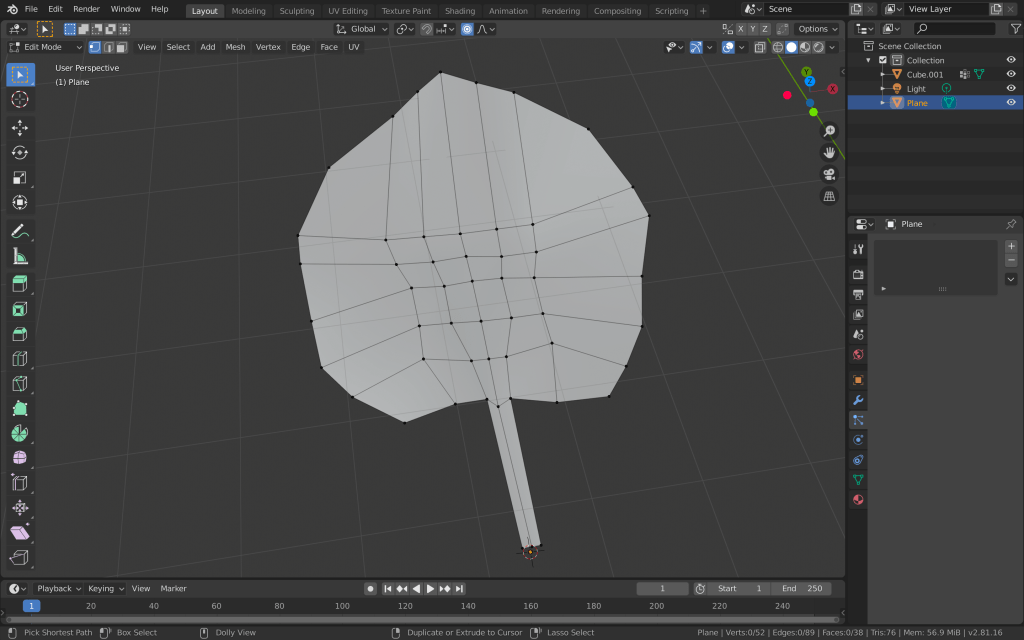
Once the trunk and branches were done, I started creating the leaf. I added a new plane and after many loop cuts and vector editing, I ended up with a relatively acceptable leaf.
I added a a bit of thickness to it and then duplicated it four times. I then connected the five leaves and made them one object.
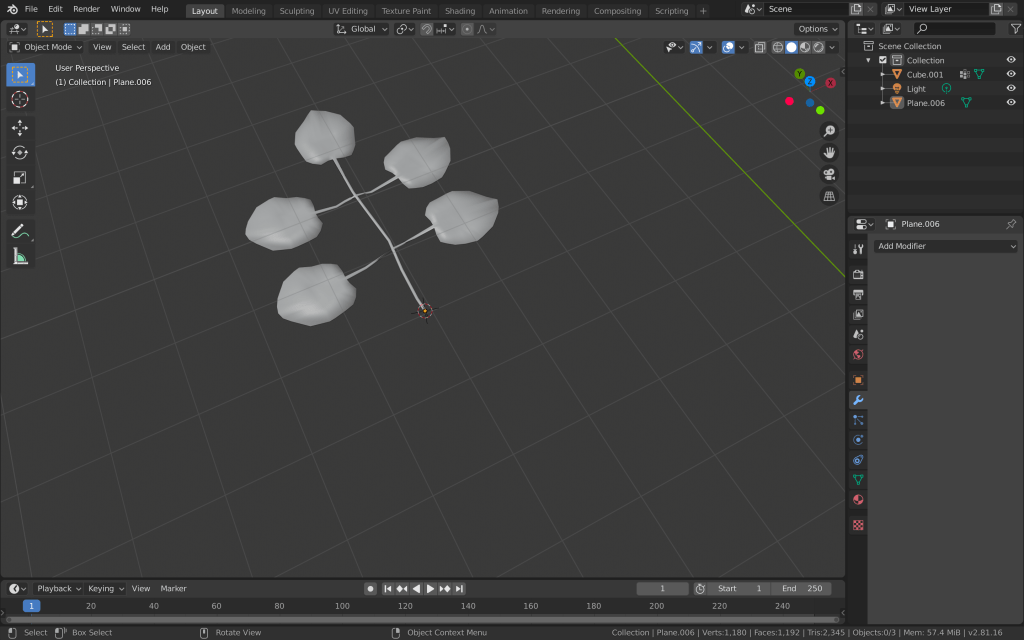
I then moved to creating a vertex group from the tree branches where the leaves are going to attach. I selected the vertices I wanted and then went in to weight paint mode to tweak it more. I then added a new particle system to the tree mesh and changed the particle type to hair. I changed the render mode to object and added the leaves object I created before. This way I replaced the particles with the leaves. I added the branch vertex group to the density vertex groups and increased the number of leaves to 300. I also changed other settings like the rotation length and randomness. I played with the particle settings for a while until I got the result I wanted. After that I went in the modifier’s tab and applied the particle system. This made all of the leaves in. individual objects. I made new vertex groups. One from the leaves and one from the tree itself. This way I can manipulate them individually (texture them) even after I make them one mesh. I then selected all of the leaves and the trunk and joined them together. After that I applied some image textures to the from the source I used before, edited the UVs and reduced the noise of the trunk texture.
I then exported the mesh to unity and made it a prefab.
After I was done with the wall, I’ve decided to create the other props for this level. I had to create a CCTV camera. I started with the cube mesh, which I scaled to make rectangle. I added a loop cut at the upper part of the mesh, selected the top and upper side faces and duplicated them. Then, I made the duplicated faces in to a separate object to which I added the solidify modifier. I adjusted the thickness and added more loop cuts for detailing.
I pulled the front vertices and rounded the top part, so it looks more like the top cover of a camera. I also extruded the front two faces inwards to make the lens of the camera.
After adding more detail to the security cam, I moved to adding the mont and the part, which is going to rotate. I added another rectangle which I attached to a sphere. I didn’t want to add too much detail to the camera, since it is a small object which is going to be seen by the player from a distance and it would be a good idea to not draw too much resources in rendering it.
I also downloaded three simple image textures from textures.com for the camera, the cover and the mount and applied them accordingly.
The CCTV camera was done but I also had to make the rotation animation for it. I started by adding two bones. One in the actual sphere and one in the stand of the camera. I made the meshes parents of the bones and went to weight paint mode to reduced the weight of the sphere, so the movement of the camera doesn’t deform it.
After that I moved to the actual animation of the camera rotation. I created an animation sequence of 30 frames. I rotated the camera to its rightmost position and added a keyframe at the first frame. I duplicated this keyframe and added it right after the end of the sequence. This way I could achieve a nice uninterrupted animation loop. Then I moved to the middle of the sequence and added another keyframe for the leftmost position of the camera.
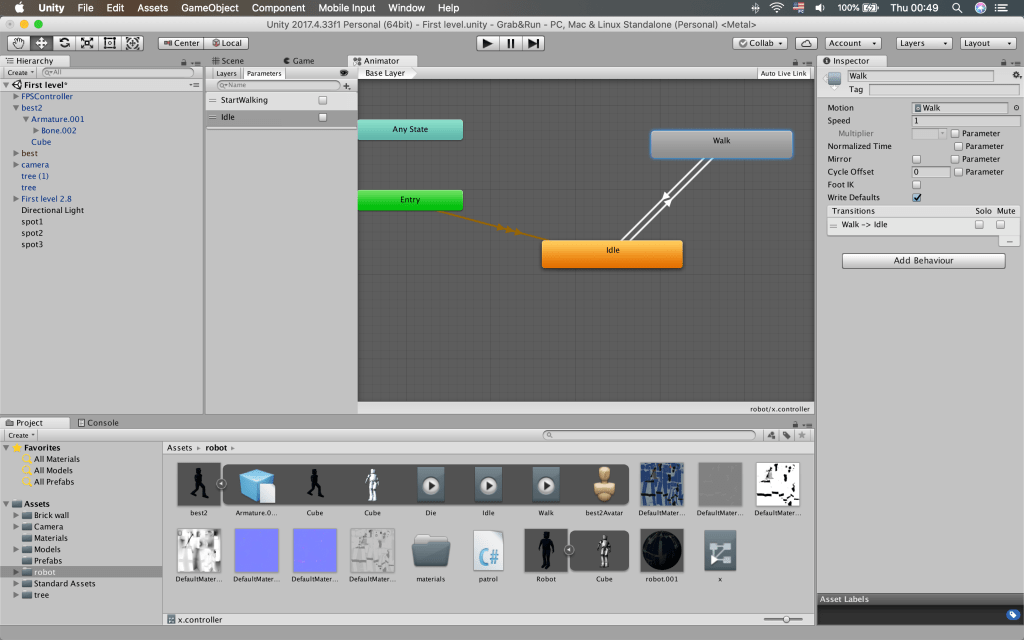
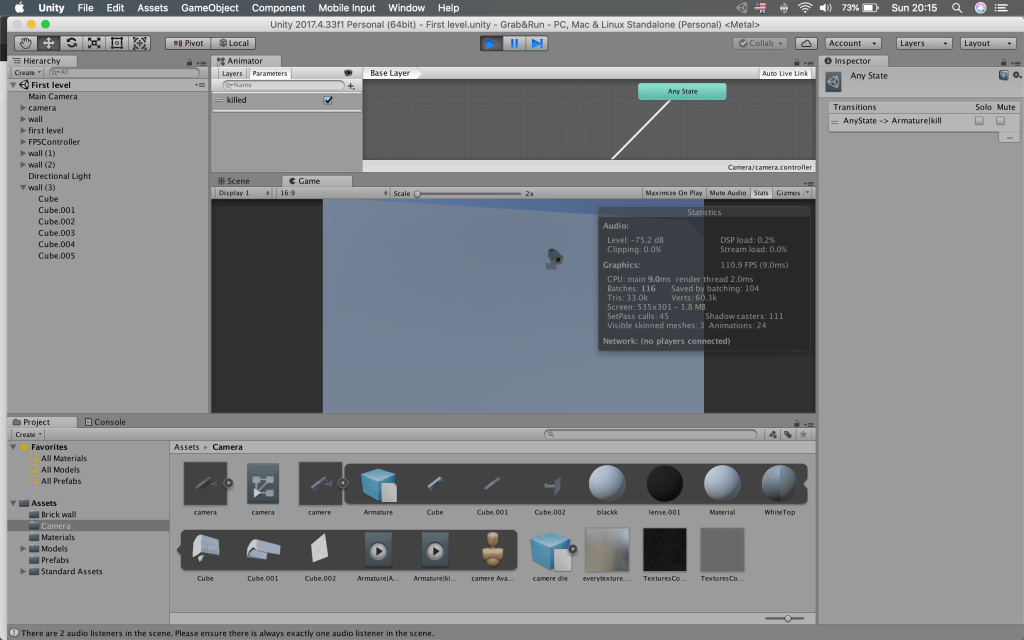
I also created an animation of the camera rotating downwards for when a player shoots it for example. After the model and animation were done, I exported them to the assets folder in fbx. format. I moved to unity and adjusted the import settings. I places the camera in the level to check if the scaling is correct. Then I added an animator controller and connected the rotation animation to the entry state. I also added a bool parameter to trigger the “disabled camera” animation from any state. On a later stage, I am going to write the code to set this bool to true when the player shoots the camera. I played the scene to see if everything works correctly and the correct animations triggers when appropriate. Everything worked as it should, except for the camera rotating too quickly, but I quickly fixed that by reducing the animation speed.
After everything was done I made the camera to a prefab so my teammates could easily use and edit it in different levels and settings.
After the initial planning, we have started to work on our assignments. Since the levels of our games are divided in to rooms, each of our group members has either a room to create, or a prop for the room to model. This way we could avoid having a large environment with much empty space and no detail.
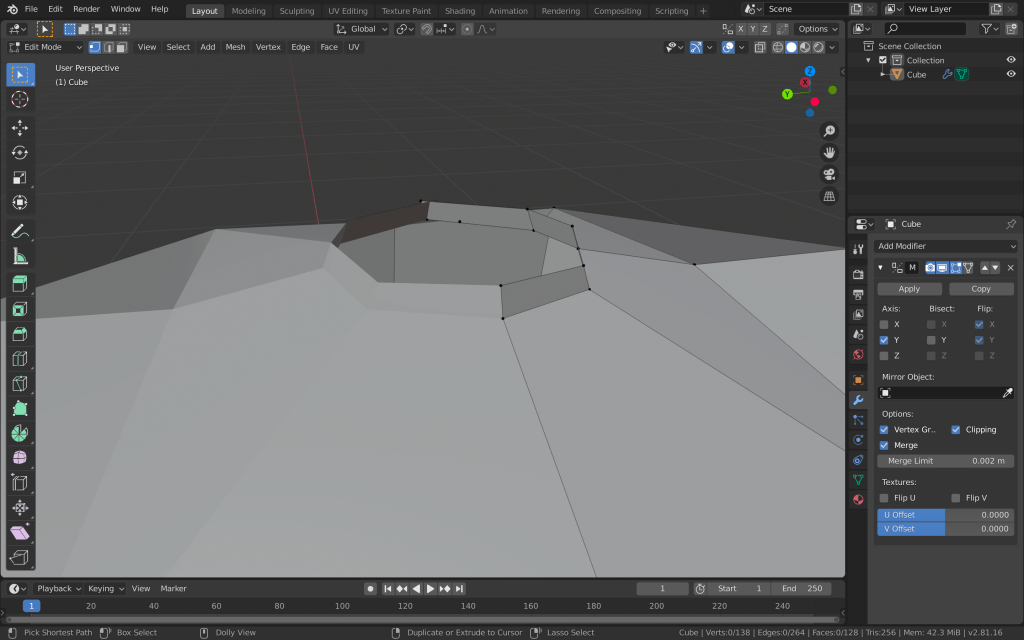
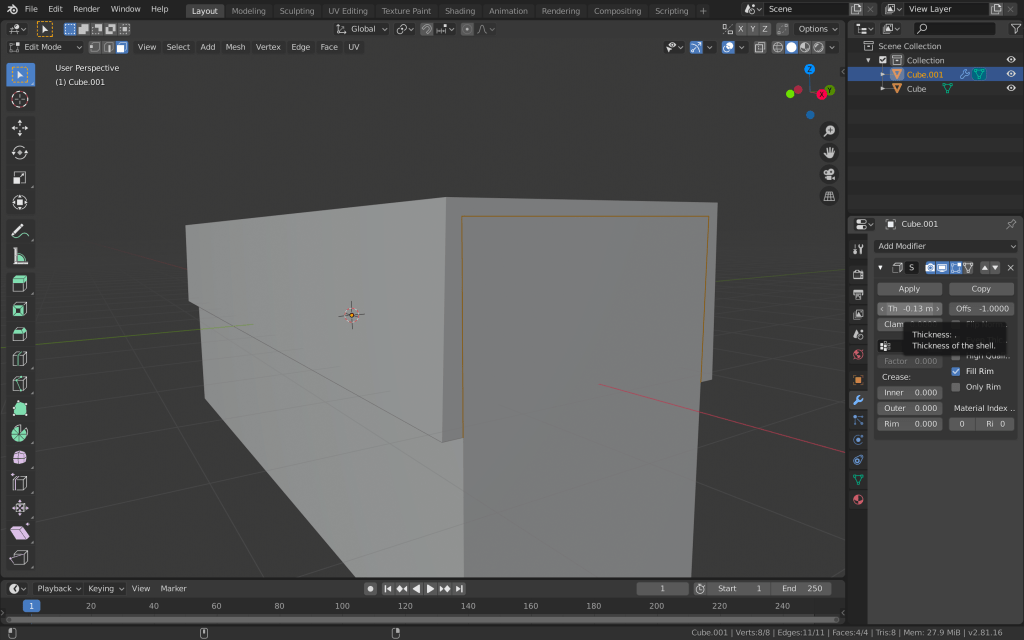
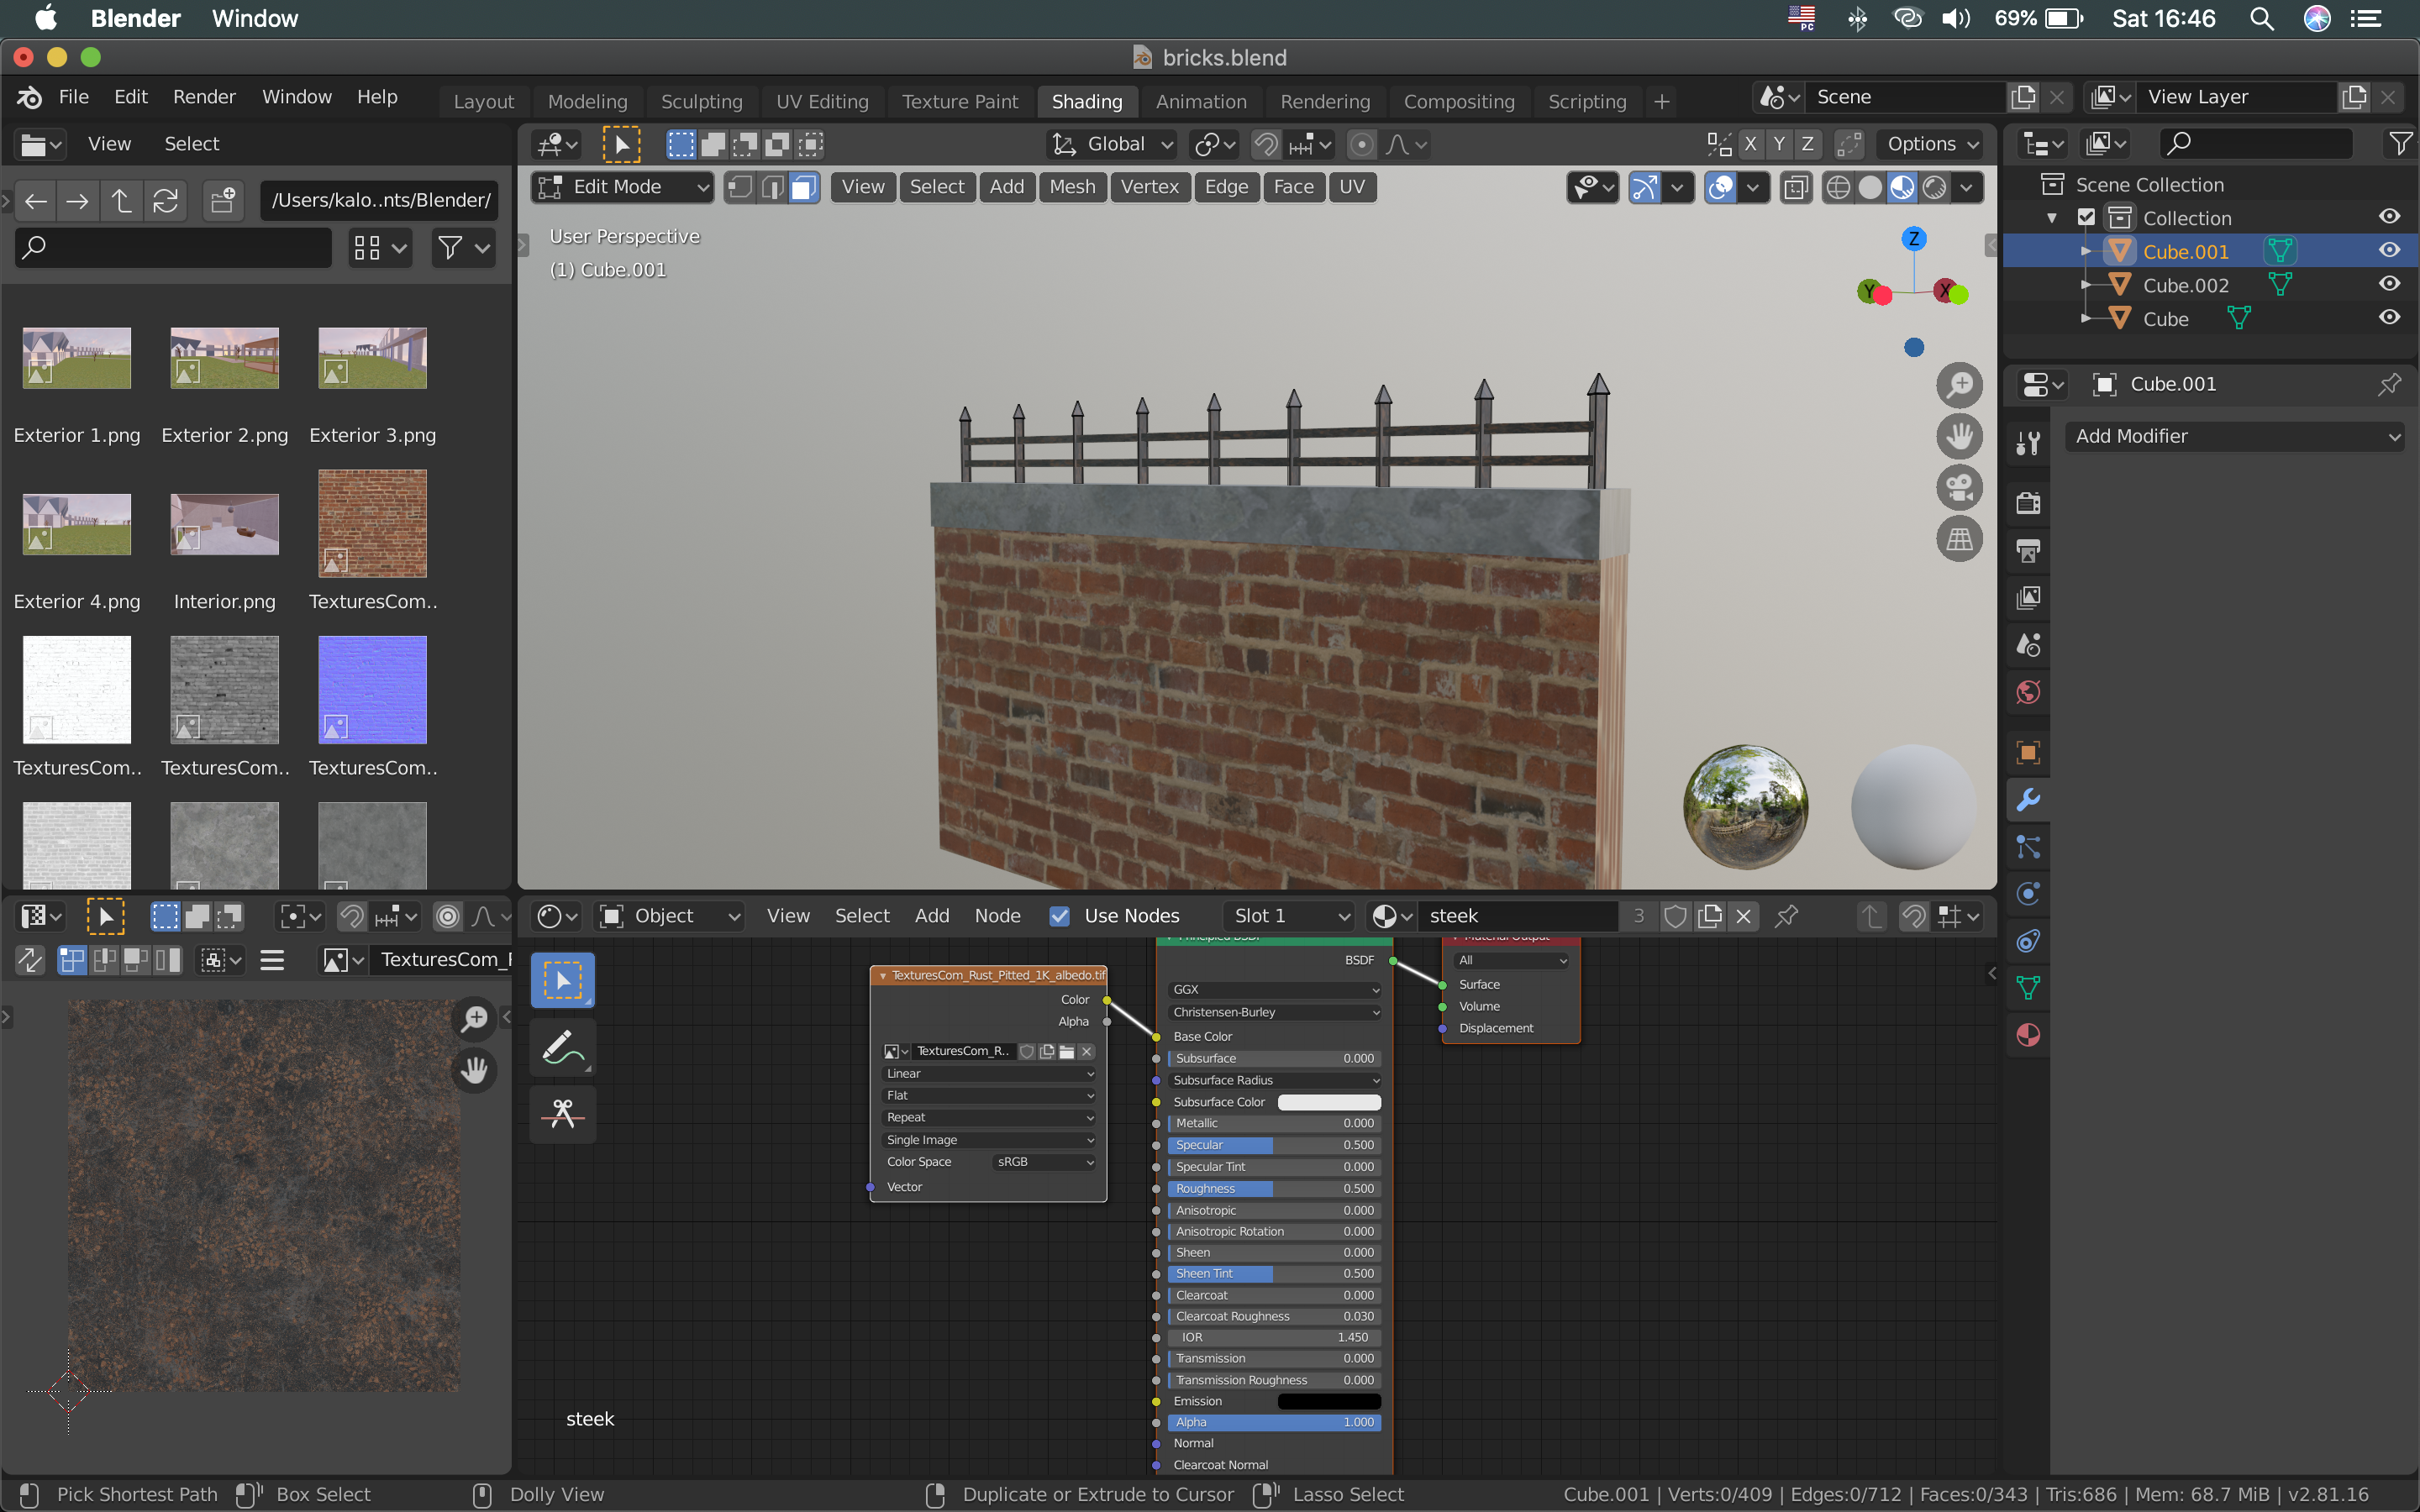
My first task is to help with the creation of the first level. This is going to be the entrance of the mansion, where the user starts the game and has to think of a way inside. I have to create a brick wall, which is going to surround the yard. I have decided to use Blender for this, as it is one of the industry standard softwares for 3D modelling.
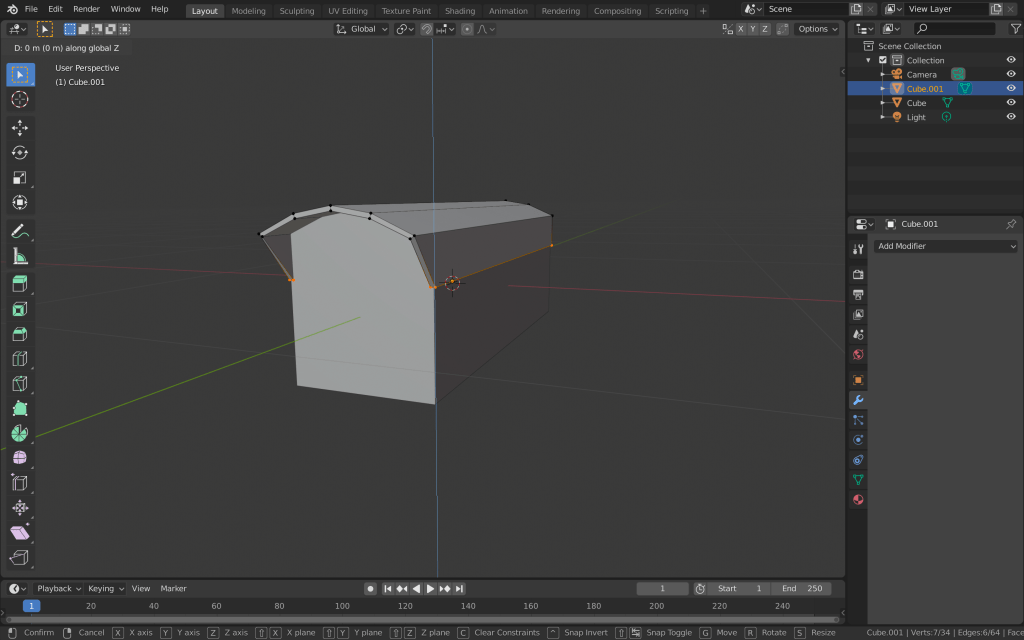
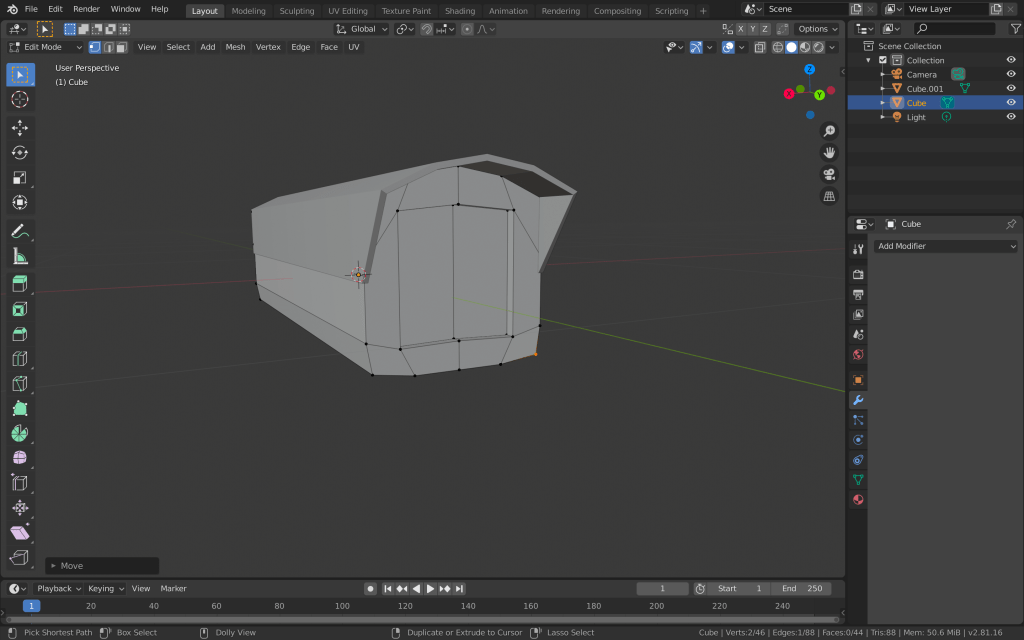
I wanted the top portion of the brick wall to imitate concrete. On top of the whole fence I am going to put iron arrows. I started the wall with the default cube and scaled it, so it becomes a rectangle. I asked the person who was modelling this scene what measures he is using, so I know the proportions of the wall. We have decided that the wall should be around 2.5m high. I scaled the rectangle accordingly and added a loop cut at the top part and extruded the new faces.
Then I moved to adding the iron arrows. I added another cube mesh, which I scaled down and rotated. I extruded this cube upwards and scaled the top face. I then extruded this face and scaled it to 0, so it becomes the top of the arrow.
After that, I added the array modifier to the arrow object and spread them across the top of the wall. I also added two rails going trough the arrows in a similar way.
After I was done with the modelling of the wall, I moved to adding textures. I downloaded bricks, iron and concrete image textures from textures.com. I started by selecting the faces where the bricks should be and UV unwrapped them. Then, I added a new material and changed the base colour to image texture. I added the texture and edited the UV so the bricks fit well in the wall. I did the same for the other two materials.
After the wall was done, I exported it as an fbx. file to the assets folder of the unity project. I also added the images of the textures to the same folder. I went in Unity to make sure everything fine. The wall is ready to be used.
After deciding on the main ideas if the game, the group moved to planning. We have decided to give each team member a role and tasks to complete. This way we can be as efficient as possible and use each of the group member’s skills as best as possible.
I took the responsibility to create the “enemy”. These are going to be the guards that are trying to stop the main character from completing his tasks. As the guards are going to be robots and not humans, I am going to create the model of the robot and later use it in many different sets and levels throughout the game. I have to make the 3D model of the robot, along with the animation rig and the actual animations of his movements. I also have to texture it.
I would also have to create some of the props for the 3D environment. Although, this is not going to be my main role, I am going to help with the creation of most of the levels. For starters, I would have to create a brick wall for the first level, which is going to be outside the mansion. To improve this scene even more, I will try to create some trees and security cameras, which are going to be a key gameplay element, as the player will try to get around them unnoticed.
In addition to this, me and the other members of my group tried to focus on designing the game with usability and playability in mind. I wanted the part of the game which I am designing and the game as a whole to be as user-friendly and as enjoyable as possible. There are many things I have to keep in mind while creating the elements for the game. I have a big responsibility to create the robots. They have a big role in the game as a whole, as they are one of the things which are going to provide the player with a feeling for challenge. I have to be careful while creating the code for their movement and behaviour because even though, the player has to face challenges, the game still has to be fun and enjoyable to play. I have to use this strategy for the security cameras as well. It could be a challenge to make them difficult to avoid, while still leaving an obvious route for that.
One of the most important aspects of our game in terms of usability is the gameplay. Some things we have to consider are varying the activities and pacing during the gameplay and providing feedback to the actions of the user. We could do that by adding different mechanics the player could use and different scenarios to use them. For example we could have one of the levels set in an environment in which the player could take advantage of the parkour abilities and another level in which he could use stealth tactics like silent taking out the guards.
Another thing to keep in mind while developing the game is the main story. Although we have decided to create a 3D game, instead of interactive story, that doesn’t mean we shouldn’t integrate a story. The player of our game has to be intrigued and interested in order to keep playing it. We have came up with a of a thief who wants to rob a mansion. But the user has to keep playing the game, in order to understand more details and uncover more of the plot. We are also going to aim for the feeling of fairness of outcomes.
The game mechanics are also a vital aspect of our game. We are going to try to provide the user with a variety of mechanics, but they also have to be easy to learn. We are going to aim for an experience in which most things react to the player’s choices and actions. Some of the mechanics are going to be normal walking, picking objects, grabbing on to objects from the environment and also the parkour interactions. Another important action for this game will be the shooting.
The game is going to be played with a normal keyboard and the usual WASD keys for walking, E for interaction, etc. Also, if there are any specific keys, we are going to make sure the user understands them consistently. We’ll also aim to provide a simple UI.